
How to build IPSec-tunnel between SonicWall and MikroTik
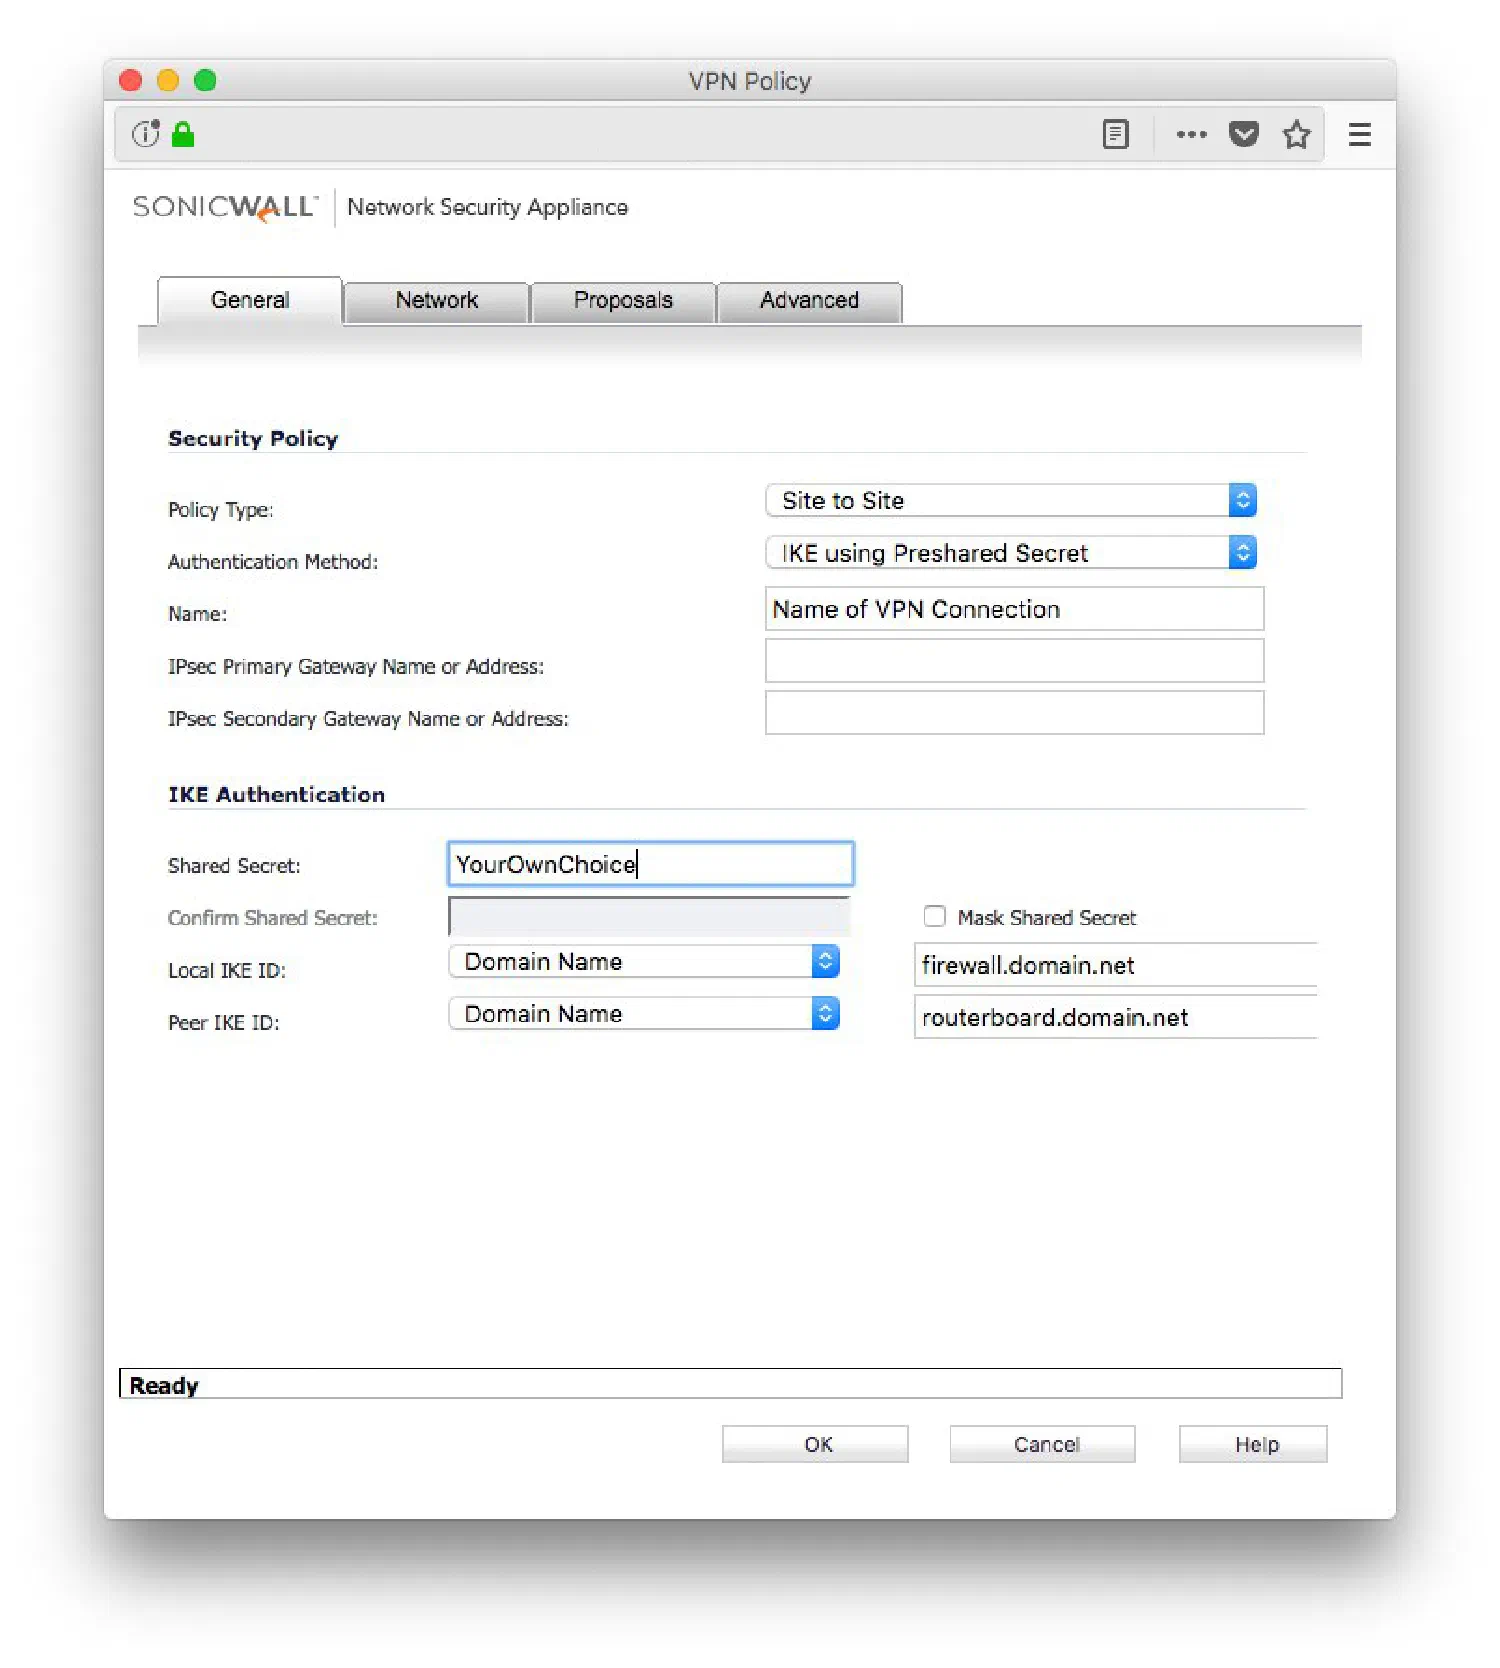
One of those challenges I faced for an assignment was the fact I had to create an IPSec-tunnel between a SonicWall firewall with a dedicated, static public IP and a MikroTik RouterBoard that would have dynamic IPs. When searching for the appropriate documentation, I couldn’t find any. So read on for my guide to building a SonicOS to RouterOS IKEv2 IPSec tunnel.
SonicWall configuration
Probably stating the obvious, but log in to the SonicWall firewall, move to the VPN tab and create a new VPN policy. If you want, you can use the SonicWall wizard instead of the manual creation of the policy as shown in the steps below.
The screenshot at the top of this post shows the General tab. Since the remote end of the tunnel (the MikroTik) hasn’t got a static IP, you can leave the gateway fields empty. Make sure you write down the shared secret — we will need it later on.
In the Network tab you specify the remote network (MikroTik end) and the local network that can be accessed. It will be used to create firewall policies automatically.
In the Proposals tab you set the phase 1 and phase 2 parameters. Note down the settings you use here, as they have to be matched on the MikroTik end as well. For this guide that means IKEv2 with DH group 2, 3DES encryption, a lifetime of 8 hours (28800 seconds) and no perfect forward secrecy.
The Advanced tab needs no changes for this setup.
More information on the SonicWall configuration can be found on the SonicWall website.
RouterOS configuration
The configuration of the MikroTik device can be done both by WinBox and the terminal. In this tutorial I use the terminal commands, but they are similar to the WinBox UI navigation.
Firewall, NAT and Fasttrack
In my scenario I wanted to tunnel multiple IP ranges on the SonicWall to my MikroTik. So for the purpose of access rules and because of the NAT bypass, I added the following address list.
/ip firewall address-list
add address=10.88.0.0/16 list=IPSec_Tunnel
add address=172.16.1.0/24 list=IPSec_Tunnel
Because of the lack of public IPv4 space and being behind a consumer dynamic connection with the RouterBoard, we’ll need to bypass NAT for the packets that are intended for the IPSec tunnel. If we don’t bypass NAT, packets will be masqueraded before being encrypted.
/ip firewall nat
add action=accept chain=srcnat comment="No NAT for IPSec" src-address=192.168.88.0/24 dst-address-list=IPSec_Tunnel
Since you should have set up a good firewall already, you’ll need to add rules to accept traffic from the IPSec tunnel. I used the following rules:
/ip firewall filter
add action=accept chain=forward comment="Allow all from VPN" src-address-list=IPSec_Tunnel
add action=accept chain=input src-address-list=IPSec_Tunnel
Note: personally I don’t use Fasttrack yet. If you do use Fasttrack, have a look at this topic in the official MikroTik wiki.
IPSec tunnels
Next up is the configuration of the IPSec tunnels. Move to the /ip ipsec menu in WinBox or in the terminal and get going.
During the set-up of the SonicWall we came across the proposals tab, in which we specified the use of 3DES with a lifetime of 8 hours (28800 seconds). Let’s add a new proposal to RouterOS to match this:
/ip ipsec proposal
add enc-algorithms=3des lifetime=8h name=sonicwall pfs-group=none
Next up, our MikroTik router needs to know where the IPSec server is located, so let’s add our SonicWall as peer:
/ip ipsec peer
add address=SonicWall-IP dh-group=modp1024 dpd-interval=disable-dpd enc-algorithm=3des exchange-mode=ike2 myid=fqdn:routerboard.domain.net secret=YourOwnChoice
As you can see, there is a first overlap here — it matches the settings on the General tab of the SonicWall firewall.
| SonicWall | MikroTik | Value |
|---|---|---|
| Shared Secret | secret | YourOwnChoice |
| Peer IKE-ID | myid= | fqdn:routerboard.domain.net — SonicWall uses the selector field, in RouterOS we specify the type as fqdn |
| IPSec Primary Gateway | address | Public IP of the SonicWall |
At this point we have the MikroTik configured to connect to its peer, the SonicWall firewall. You’ll notice there is a connection on the /ip ipsec remote-peers tab.
Last but not least we have to add the necessary IPSec policies, so traffic will be matched to these policies.
/ip ipsec policy
add dst-address=10.88.0.0/16 level=unique proposal=sonicwall \
    sa-dst-address=SonicWall-IP sa-src-address=0.0.0.0 src-address=192.168.88.0/24 tunnel=yes
add dst-address=172.16.1.0/24 level=unique proposal=sonicwall \
    sa-dst-address=SonicWall-IP sa-src-address=0.0.0.0 src-address=192.168.88.0/24 tunnel=yes
In the IPSec policy we use level unique, because we want to tunnel multiple subnets to the SonicWall firewall. If you use the default required, only one remote network is accessible by the IPSec tunnel.
Done!
If everything has gone as planned, we should now see the VPN connection turn green on both sides of the tunnel. On RouterOS you can verify it by running /ip ipsec installed-sa print, which will output the imported SAs from the SonicWall.
In the SonicWall you’ll see a green light next to the VPN tunnel, and the tunnel will show up in the status screen.
At this point you should run a variety of checks to verify connectivity through the VPN tunnel. If you followed this guideline, everything should work fine.
Questions?
If you’re having trouble and cannot get it to work properly, you may ask for help from the MikroTik community. If you want me to help you with your question, you can send me a message.
SonicWall and MikroTik and their logos are copyright protected; they were used as illustration for this blog.